Connecting Your AI Chatbot to WhatsApp Business
Unlock the power of conversational AI on the world’s most popular messaging app by integrating your iSales AI Chatbot with WhatsApp Business. This guide will walk you through the process, which primarily involves setting up an app on the Meta Developers Platform and configuring it to work with your iSales AI Chatbot.
Remember for WhatsApp AI ChatBot you need a separate Business Account that would be only handled by AI.
WhatsApp Integration Overview in iSales AI:
Your iSales AI dashboard for WhatsApp Business provides:
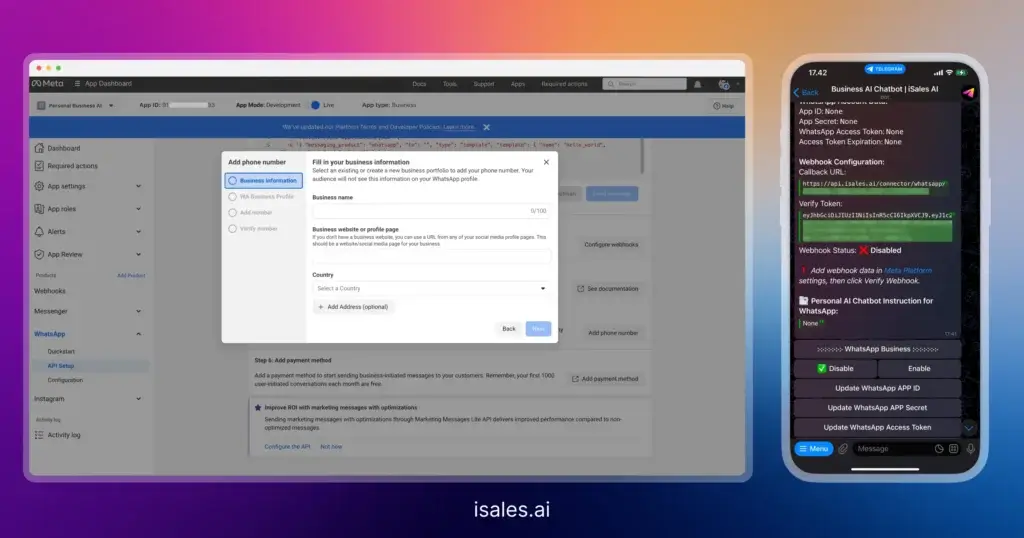
- WhatsApp Account Data: Fields to input your
App ID,App Secret, andWhatsApp Access Tokenobtained from your Meta Developer App. It also showsAccess Token Expiration. - Webhook for WhatsApp:
Callback URL: A unique URL provided by iSales AI (e.g.,https://api.isales.ai/connector/whatsapp/your-unique-id) that Meta will send message events to.Verify Token: A unique token provided by iSales AI (e.g., a long JWT string) used by Meta to verify your Callback URL.Webhook Status: (e.g., Disabled) – Indicates if Meta has successfully verified and is sending events to your Callback URL.
- Statuses:
WhatsApp Business: (e.g., ❌ Disabled) – Overall status of the WhatsApp integration.AI Instruction: (e.g., General) – Shows if the bot is using general or personal instructions for WhatsApp.
- WhatsApp Statistics: Tracks
Total Chats,Total Messages,Total Expenses, andCost per Messagespecifically for WhatsApp. - Personal AI Chatbot Instruction for WhatsApp: Area to potentially customize instructions solely for WhatsApp interactions.
- Management Buttons:
- Enable/Disable WhatsApp Business integration.
- Buttons to Update
WhatsApp APP ID,APP Secret, andAccess Token. - Options to switch between
GeneralandPersonalAI Instructions for WhatsApp. - Selection for
WhatsApp AI Intelligence(Mini AI, Basic AI, Analytical AI, Super Intelligent AGI, or specific models like GPT-4o Mini, etc.). Update Personal Instructionbutton.Download WhatsApp Chat History.
Screenshot Fast Track for AI chatbot integration to your Whatsapp
Step-by-Step Connection Guide (Meta Developers Platform & iSales AI)
Connecting your iSales AI Chatbot to WhatsApp Business requires configuration on both the Meta Developers Platform (developers.facebook.com) and within your iSales AI settings.
Prerequisites:
- A Facebook Developer Account.
- A Meta Business Account.
- A WhatsApp Business Account (WABA) and a phone number linked to it that is not currently active on the consumer WhatsApp app.
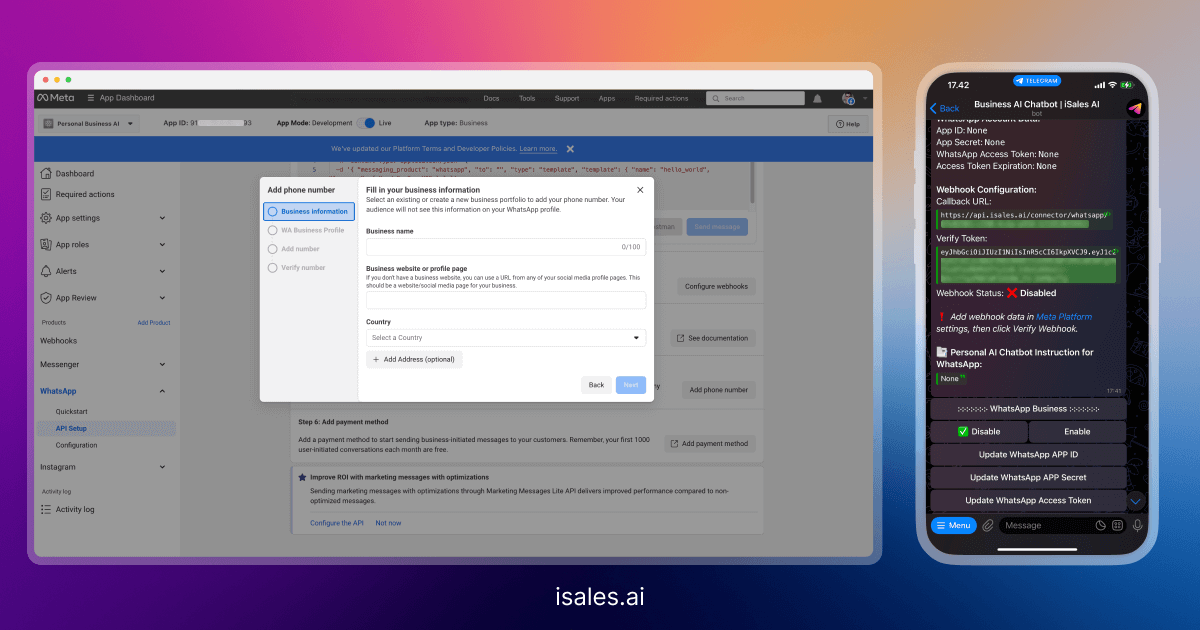
Phase 1: Setting up Your App on Meta Developers Platform
- Go to Meta for Developers: Navigate to https://developers.facebook.com/ and log in.
- Create a New App:
- Click on “My Apps” and then “Create App.”
- Select “Business” as the app type. Click “Next.”
- Provide an “App Display Name” (e.g., “MyCompany WhatsApp Bot”).
- Enter your “App Contact Email.”
- Select your “Meta Business Account” from the dropdown. If you don’t have one, you might need to create it.
- Click “Create App.” You may need to re-enter your Facebook password.
- Add WhatsApp Product to Your App:
- On your new app’s dashboard, scroll down to “Add products to your app.”
- Find “WhatsApp” and click “Set up.”
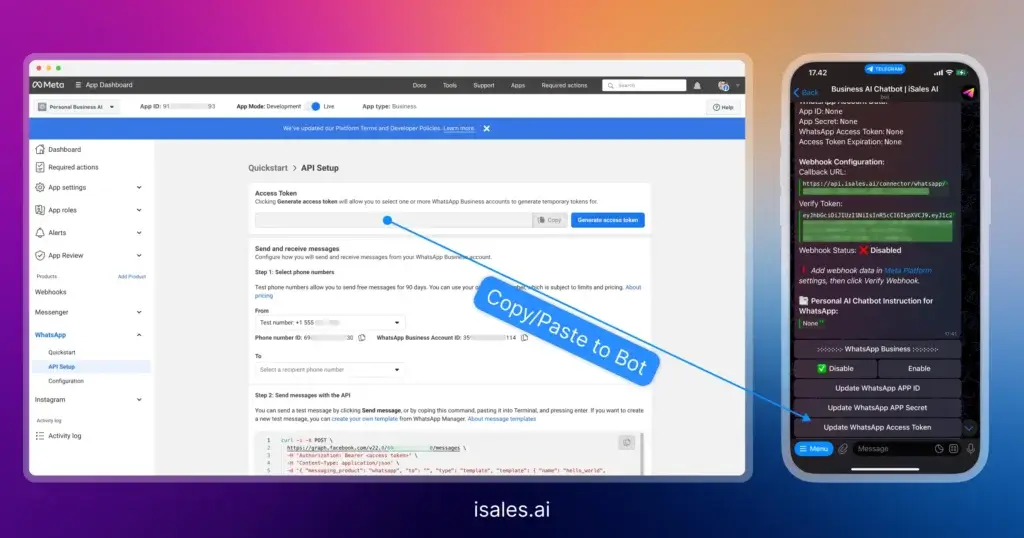
- Configure WhatsApp API:
- You’ll be taken to the WhatsApp Get Started page within your app’s dashboard.
- Meta often provides a temporary test number. For a production setup, you’ll need to add your own phone number.
- Important: You will find your
Temporary access tokenhere. Copy this token. This is your initialWhatsApp Access Tokenfor iSales AI. Note: These tokens expire and will need to be refreshed or replaced with a permanent System User token for long-term use. - You’ll also see a
Phone number IDandWhatsApp Business Account ID. Keep these handy.
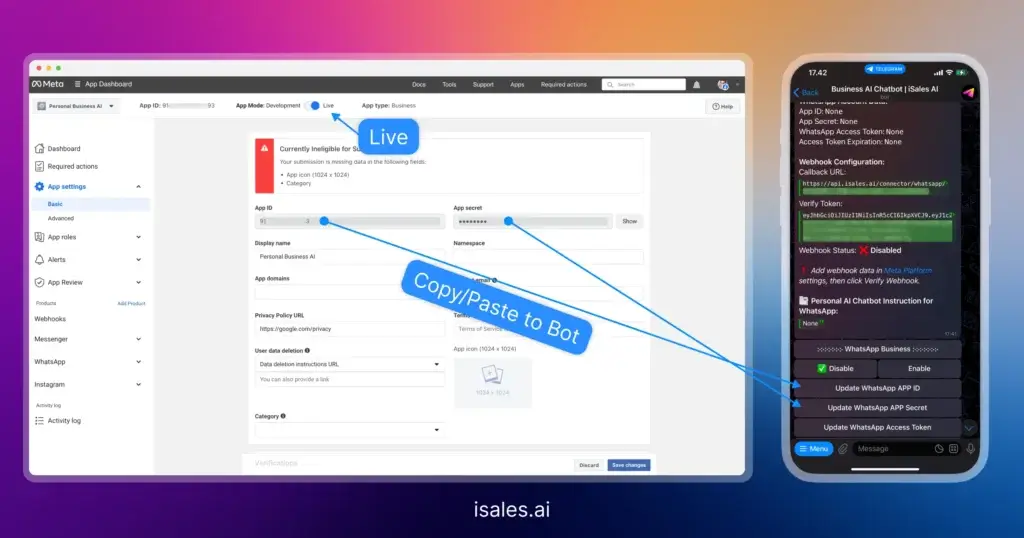
- Get Your App ID and App Secret:
- In the left-hand navigation menu of your Meta Developer App, go to “App Settings” -> “Basic.”
- Here you will find your
App IDandApp Secret. Copy both of these.
Phase 2: Configuring Webhooks in Meta Developer App & iSales AI
- Go to iSales AI WhatsApp Settings:
- Navigate to the “AI Chatbot for WhatsApp Business” page in your iSales AI platform.
- You will find a unique
Callback URLandVerify Tokenprovided by iSales AI. Copy both of these values.
- Configure Webhook in Meta Developer App:
- Go back to your app on the Meta Developers Platform.
- In the left navigation, under “WhatsApp,” click on “Configuration” (or it might be under “API Setup”).
- Find the “Webhook” section and click “Edit.”
- Paste the
Callback URLfrom iSales AI into the “Callback URL” field on the Meta platform. - Paste the
Verify Tokenfrom iSales AI into the “Verify token” field on the Meta platform. - Click “Verify and Save.” Meta will attempt to send a verification request to the iSales AI Callback URL.
- Subscribe to Message Webhook Events:
- Still in the Webhook configuration on Meta, click on “Manage” or “Webhook fields.”
- Ensure you subscribe to the
messages. This tells Meta to send incoming message events to your iSales AI webhook. Click “Done.”
- Verify Webhook Status in iSales AI:
- The iSales AI WhatsApp settings page has a
Webhook Statusfield. It might also have a button like “Verify Webhook.” - After configuring the webhook in Meta, check this status in iSales AI. It should update to “Enabled” or “Verified” if the setup was successful. If there’s a button, click it. The screenshot says: “Please add the webhook data in the Meta Platform settings and then click the Verify Webhook button.” (Assuming such a button exists or the status updates automatically).
- The iSales AI WhatsApp settings page has a
Phase 3: Entering Credentials in iSales AI & Enabling
- Input Meta Credentials into iSales AI:
- On the “AI Chatbot for WhatsApp Business” page in iSales AI:
- Click “Update WhatsApp APP ID” and paste the
App IDyou copied from Meta. - Click “Update WhatsApp APP Secret” and paste the
App Secretyou copied from Meta. - Click “Update WhatsApp Access Token” and paste the
WhatsApp Access Token(initially the temporary one) you copied from Meta.
- Click “Update WhatsApp APP ID” and paste the
- On the “AI Chatbot for WhatsApp Business” page in iSales AI:
- Enable WhatsApp Business in iSales AI:
- Under the “WhatsApp Business” section (or similar), click the “Enable” button.
- The
WhatsApp Businessstatus should change from ❌ Disabled to ✅ Enabled.
Phase 4: Testing and Further Configuration (Optional)
- Send a Test Message: Send a message from a personal WhatsApp account to your WhatsApp Business phone number linked to the API. The iSales AI Chatbot should respond if the integration is working.
- Configure AI Instructions for WhatsApp (Optional):
- In iSales AI, under “WhatsApp AI Instruction“, choose between:
General: Uses the main bot instructions.Personal: Allows you to set specific instructions for WhatsApp interactions via the “Update Personal Instruction” button.
- In iSales AI, under “WhatsApp AI Instruction“, choose between:
- Set AI Intelligence for WhatsApp (Optional):
- Under “WhatsApp AI Intelligence“, select the desired intelligence level (Mini AI, Basic AI, Analytical AI, Super Intelligent AGI) or a specific LLM model for WhatsApp conversations. This allows you to optimize performance and cost specifically for this channel.
- Monitor Statistics: Keep an eye on the
WhatsApp Statisticsin iSales AI to track chats, messages, and expenses.