Connecting Your AI Bot to Telegram Business: A Step-by-Step Guide
Integrate your iSales AI Chatbot directly with your Telegram account to automate responses, manage customer interactions, and streamline your business communications. This guide will walk you through the necessary steps.
Understanding Telegram Business Tools
It’s important to note that “Telegram Business” isn’t a separate application but rather a suite of tools available to Telegram Premium users. These tools enhance your ability to interact with customers and include features for creating business accounts, managing chatbots, and more. Your iSales AI Bot leverages these capabilities.
Step-by-Step Connection Process:
Follow these steps to connect the @personal_business_bot (or your specific iSales AI Bot instance) to your Telegram Business account:
Step 1: Ensure Prerequisites
- Telegram Premium: You must have an active Telegram Premium subscription on the account you wish to use for business.
- iSales AI Bot Account: Ensure you have your iSales AI Bot (
@personal_business_botor your designated bot) ready and have initiated it if required (e.g., by going to the bot in Telegram and clicking “Start”).
Step 2: Access Telegram Business Settings
- Open your Telegram app on your mobile device or desktop.
- Go to Settings.
- On mobile, this is usually found in the tab bar (iOS) or hamburger menu (Android).
- On desktop, it’s typically in a menu accessible via your profile picture or a settings icon.
- In the Settings menu, locate and tap on Telegram Business. This option will only be visible if you have Telegram Premium.
Step 3: Navigate to Chatbots Section
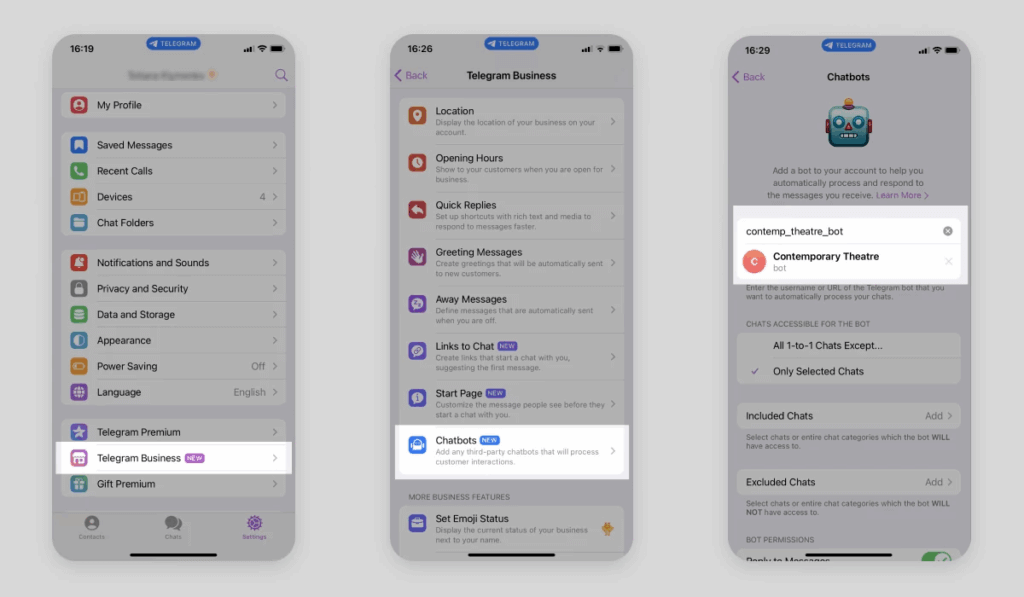
- Within the “Telegram Business” settings (as shown in the first panel of the provided image example, which displays options like “Location,” “Opening Hours,” etc.), scroll down or look for the Chatbots option.
- Tap on Chatbots. The description usually reads something like: “Add any third-party chatbots that will process customer interactions.”
Step 4: Add Your iSales AI Bot
- You will now be on the “Chatbots” screen (similar to the third panel in the image example). This screen explains that you can add a bot to automatically process and respond to messages.
- In the input field provided (often labeled “Add a bot…” or showing a search icon), enter the username of your iSales AI Bot. For example, type:
@personal_business_bot. - As you type, Telegram will search for the bot. When your bot (
@personal_business_botor your specific bot name, e.g., “contemp_theatre_bot” in the image example) appears in the drop-down list, select it. - After selecting, you will likely be prompted to confirm. Click Add (or a similar confirmation button).
Step 5: Define Chat Accessibility for the Bot
Once the bot is added, you need to specify which chats it will have access to. Telegram provides granular control over this:
- All 1-to-1 Chats (with exceptions possible):
- This option grants the bot access to all private messages (1-to-1 chats) you receive from your contacts.
- You can often specify exceptions if needed (e.g., “All 1-to-1 Chats Except…”).
- Only Selected Chats:
- This option provides more precise control, allowing the bot to access only specific contacts or groups of contacts.
- Included Chats: Tap “Add” next to “Included Chats” to select individual contacts, groups of contacts (e.g., based on new chats, saved contacts, unsaved contacts), or entire chat categories that the bot WILL have access to.
- Excluded Chats: Tap “Add” next to “Excluded Chats” to select individual contacts, groups, or chat categories that the bot WILL NOT have access to, even if they fall under a broader “Included Chats” category.
Step 6: Review Bot Permissions (Optional but Recommended)
- Below the chat accessibility settings, you may find a section for “BOT PERMISSIONS.”
- Review these permissions to understand what actions the bot is allowed to perform within the chats it has access to (e.g., read messages, send messages, etc.).
Step 7: Confirmation and Activation
- Once you’ve configured the chat access and permissions to your satisfaction, save your settings.
- Your iSales AI Bot (
@personal_business_bot) is now connected to your Telegram Business account and will start processing messages from the chats you’ve granted it access to, according to its AI configuration within the iSales platform.
By following these steps, you can successfully integrate your AI chatbot with Telegram Business, enabling it to serve as an efficient automated assistant for your customer communications. Remember to configure your bot’s behavior, knowledge base, and other settings within the iSales AI platform to ensure it performs as desired.