Connecting iSales AI Chatbot to Facebook Business
Connect with your customers on one of the world’s largest social platforms by integrating your iSales AI Chatbot with your Facebook Business Page. This allows your AI assistant to manage Messenger conversations, provide instant support, and engage with users who interact with your Page. The setup involves configuring an app on the Meta Developers Platform and linking it with your iSales AI settings.
Facebook Integration Overview in iSales AI:
Your iSales AI dashboard for Facebook Business provides:
- Facebook Account Data:
APP ID: Your Meta App ID.APP Secret: Your Meta App Secret.Facebook Access Token: The Page Access Token that authorizes iSales AI to interact with your Facebook Page’s Messenger.Facebook Access Token Expiration: Shows when the current Page Access Token will expire.
- Webhook for Facebook:
Callback URL: A unique URL provided by iSales AI (e.g.,https://api.isales.ai/connector/facebook/your-unique-id) where Meta will send message events from your Facebook Page.Verify Token: A unique token from iSales AI (e.g., a long JWT string) used by Meta to verify your Callback URL.Webhook Status: (e.g., ✅ Enabled) – Indicates if Meta has successfully verified and is sending events to your Callback URL.
- Statuses:
Facebook Business: (e.g., ❌ Disabled) – Overall status of the Facebook integration.AI Instruction: (e.g., General) – Shows if the bot is using general or personal instructions for Facebook.
- Facebook Statistics: Tracks
Total Chats,Total Messages,Total Expenses, andCost per Messagespecifically for Facebook Messenger. - Personal AI Chatbot Instruction for Facebook: An area to define custom instructions tailored for Facebook Messenger interactions.
- Management Buttons (from the second screenshot):
- Enable/Disable Facebook Business integration.
- Buttons to
Update Meta App ID,Update Meta App Secret, andUpdate Facebook Access Token. - Options to switch between
GeneralandPersonalAI Instructions for Facebook. - Selection for
Facebook AI Intelligence(Mini AI, Basic AI, Analytical AI, Super Intelligent AGI, or specific models). Update Personal Instructionbutton.Download Facebook Chat History.
Screenshot Fast Track to setup chatbot integration with Facebook Business (Your Facebook Page)


Step-by-Step Connection Guide for Facebook (Meta Developers Platform & iSales AI)
Connecting your iSales AI Chatbot to Facebook Business (Messenger) requires setup on both the Meta Developers Platform (developers.facebook.com) and within your iSales AI settings.
Prerequisites:
- A Facebook Page for your business.
- A Facebook Developer Account.
- A Meta Business Account that manages your Facebook Page.
Phase 1: Setting up/Configuring Your App on Meta Developers Platform
- Go to Meta for Developers: Navigate to https://developers.facebook.com/ and log in.
- Select or Create an App:
- If you already created an app for WhatsApp or Instagram integration, you can often use the same app. If not, create a new app:
- Click “My Apps” -> “Create App.”
- Select “Business” as the app type. Click “Next.”
- Fill in “App Display Name” (e.g., “MyPage Messenger Bot”), “App Contact Email,” and select your “Meta Business Account.”
- Click “Create App.”
- If you already created an app for WhatsApp or Instagram integration, you can often use the same app. If not, create a new app:
- Add Messenger Product to Your App:
- From your app’s dashboard, scroll to “Add products to your app.”
- Find “Messenger” and click “Set up.”
- Get Your App ID and App Secret:
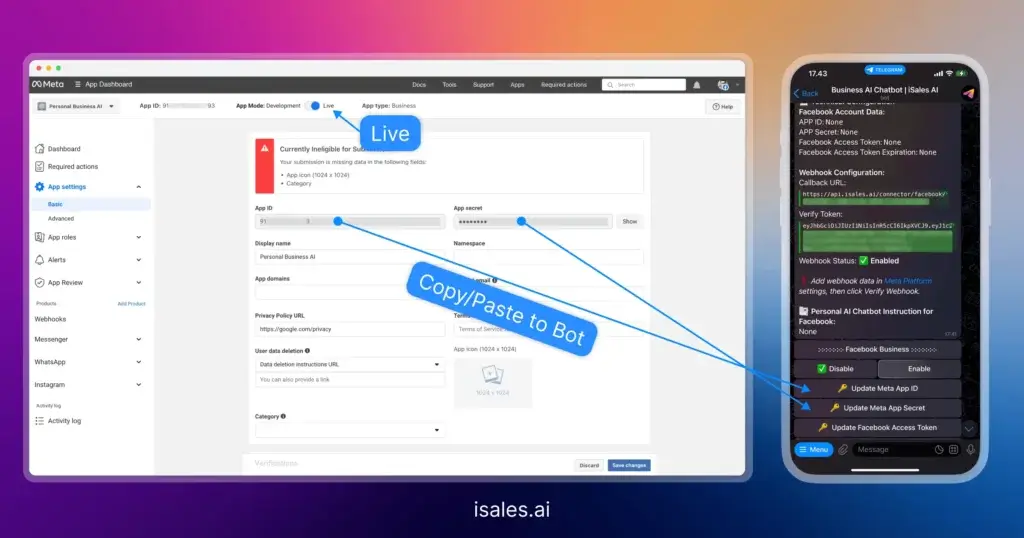
- In the left-hand navigation menu of your Meta Developer App, go to “App Settings” -> “Basic.”
- Here you will find your
App IDandApp Secret. Copy both of these.
- Generate a Page Access Token:
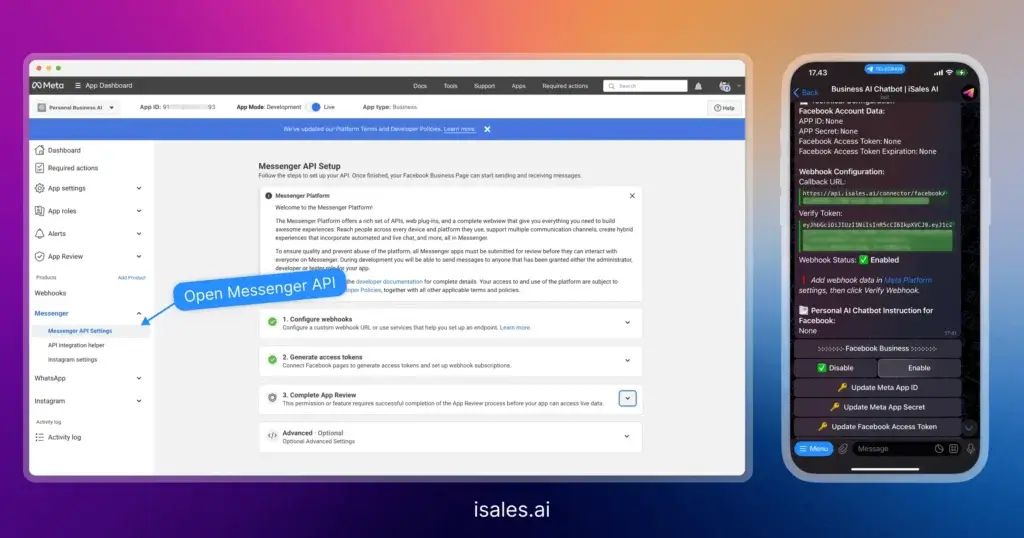
- In the left navigation, under “Messenger,” click on “Settings” (or “API Setup”).
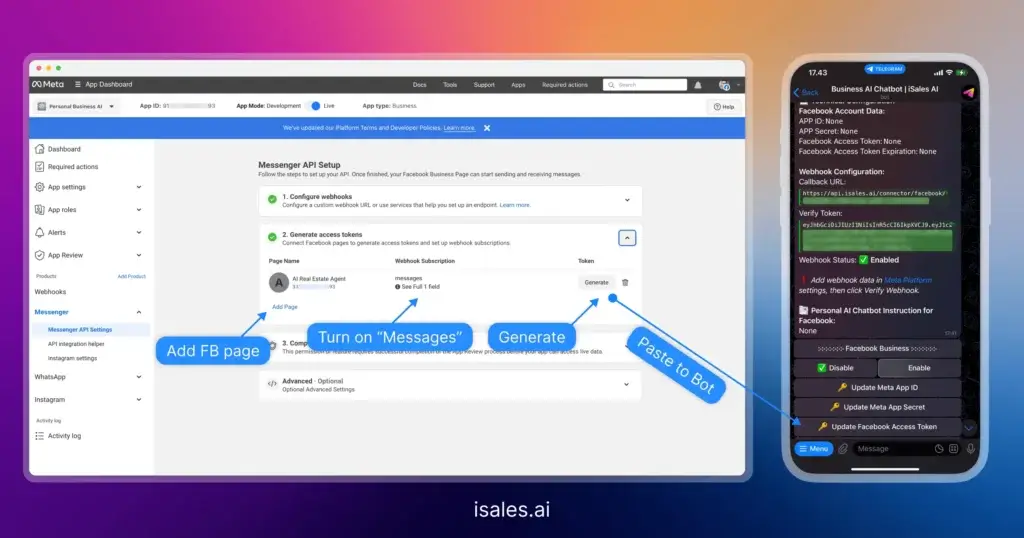
- Find the “Access Tokens” section.
- Select the Facebook Page you want to connect from the dropdown.
- Ensure necessary permissions like
pages_messagingandpages_show_listare granted. - Click “Generate Token.” Copy this token. This is your
Facebook Access Token(Page Access Token) for iSales AI. Note: This token might be short-lived initially and may need to be replaced with a long-lived token for continuous operation.
Phase 2: Configuring Webhooks in Meta Developer App & iSales AI
- Go to iSales AI Facebook Settings:
- Navigate to the “AI Chatbot for Facebook Business” page in your iSales AI platform.
- You will find a unique
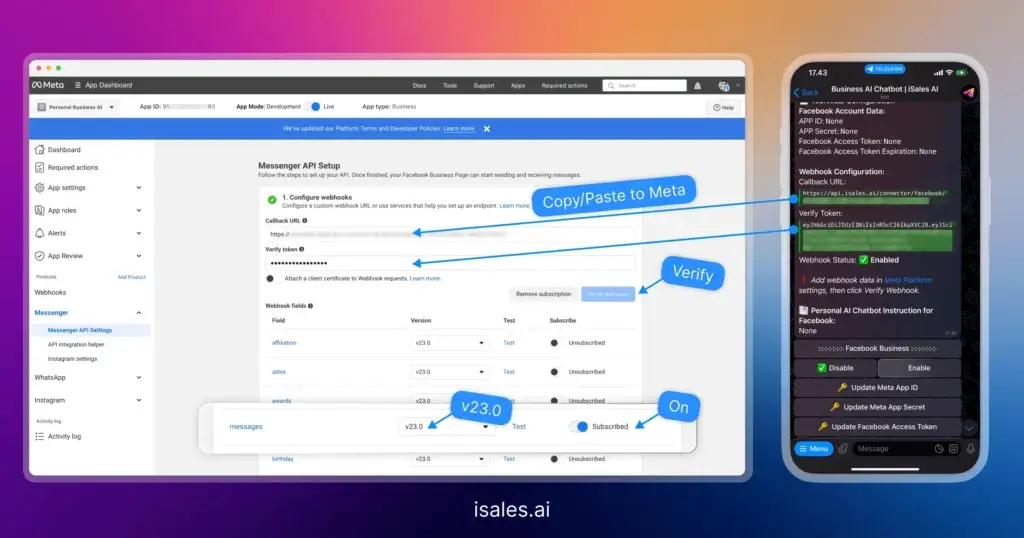
Callback URLandVerify Tokenprovided by iSales AI for Facebook. Copy both of these values.
- Configure Webhook in Meta Developer App for Messenger:
- Go back to your app on the Meta Developers Platform.
- In the left navigation, under “Messenger,” click on “Settings.”
- Find the “Webhooks” section (it might also be labeled “Callback URL Setup for Pages”).
- Click “Add Callback URL” or “Edit” if it exists.
- Paste the
Callback URLfrom iSales AI into the “Callback URL” field on the Meta platform. - Paste the
Verify Tokenfrom iSales AI into the “Verify token” field on the Meta platform. - Click “Verify and Save.”
- Subscribe Page to Webhook Events:
- Still in the Webhook configuration on Meta for Messenger, select your Facebook Page from the dropdown.
- Click “Add Subscriptions” or “Edit Events.”
- Subscribe to the necessary fields for messages. This typically includes
message. - Save your subscriptions for the Page.
- Verify Webhook Status in iSales AI:
- Check the
Webhook Statuson the iSales AI Facebook settings page. It should update to “Enabled” or “Verified.” If there’s a “Verify Webhook” button (as indicated by the prompt in the screenshot), click it after configuring in Meta.
- Check the
Phase 3: Entering Credentials in iSales AI & Enabling
- Input Meta Credentials into iSales AI:
- On the “AI Chatbot for Facebook Business” page in iSales AI:
- Click “Update Meta App ID” and paste the
App IDyou copied. - Click “Update Meta App Secret” and paste the
App Secretyou copied. - Click “Update Facebook Access Token” and paste the
Facebook Access Token(Page Access Token) you generated.
- Click “Update Meta App ID” and paste the
- On the “AI Chatbot for Facebook Business” page in iSales AI:
- Enable Facebook Business in iSales AI:
- Under the “Facebook Business” section, click the “Enable” button.
- The
Facebook Businessstatus should change to ✅ Enabled.
Phase 4: Testing and Further Configuration (Optional)
- Send a Test Message:
- Go to your Facebook Page and send a message to it as a user (or use the “Test Button” feature if available in Meta Developer settings for Messenger).
- The iSales AI Chatbot should respond in Messenger if the integration is working.
- Configure AI Instructions for Facebook (Optional):
- In iSales AI, under “Facebook AI Instruction“, choose
GeneralorPersonal. IfPersonal, use “Update Personal Instruction” to tailor bot behavior for Facebook Messenger.
- In iSales AI, under “Facebook AI Instruction“, choose
- Set AI Intelligence for Facebook (Optional):
- Under “Facebook AI Intelligence“, select the preferred intelligence level or specific LLM model for Facebook.
- Monitor Statistics: Use the
Facebook Statisticsin iSales AI to track performance.
By following these steps, you can successfully integrate your iSales AI Chatbot with your Facebook Business Page Messenger, automating responses and enhancing engagement with your Facebook audience. Always consult the latest official documentation from both Meta and iSales AI as platform interfaces and procedures can evolve.
